IoT
아두이노 센서값 웹페이지로 출력하기(라즈베리파이, PHP)
serin99
2023. 3. 3. 00:23
728x90
이전 포스팅에서 다뤄본 CO2센서인 MG811의 측정값을
데이터베이스와 연동하여 웹 페이지로 출력하는 포스팅이다.
https://serin99.tistory.com/21
CO2 센서
이산화탄소의 농도를 측정할 수 있는 센서 MG811를 사용해 보는 포스팅이다. 이 센서는 30~60초 정도 예열을 통해 센서를 약간 뜨겁게 만들고 이후 화학반응을 통해 CO2의 농도를 AOUT(혹은 Vout)으로
serin99.tistory.com
하드웨어구성


소스코드
더보기
// WIFI 초기설정
#include <string.h>
#include "ESP8266.h"
#include <SoftwareSerial.h>

#define SSID "공유기나 와이파이명"
#define PASSWORD "공유기나 와이파이 비밀번호"
#define SERVERIP "서버로 사용할 IP"
SoftwareSerial mySerial(11,10);

// 센서 초기설정
#define MG_PIN (0) //A0 핀
#define BOOL_PIN (9) //D9
#define DC_GAIN (8.5)
#define READ_SAMPLE_INTERVAL (50) // 측정반복간격
#define READ_SAMPLE_TIMES (5) // 측정반복횟수
#define ZERO_POINT_VOLTAGE (0.160)
#define REACTION_VOLTGAE (0.010)
float CO2Curve[3] = {2.602,ZERO_POINT_VOLTAGE,(REACTION_VOLTGAE/(2.602-3))};

//setup

void setup(){

//wifi 연결
 Serial.begin(9600);
 mySerial.begin(9600);
 Serial.println("ESP8266 connect");
 boolean connected=false;
 for(int i=0;i<10;i++)
 {
  if(connectWiFi())
   {
  connected = true;
   break;
  }
   }
  if (!connected){while(1);}

  // 센싱 시작 알림
  Serial.print("MG-811 Demostration\n");
  delay(1000);
  }

//MG811 센싱
void loop(){

int percentage;
float volts;


volts = MGRead(MG_PIN);

Serial.print( "SEN-00007:" );
Serial.print(volts);
Serial.print( " V / before_amp : " );
Serial.print(volts/DC_GAIN);
Serial.print( " V " );

percentage = MGGetPercentage(volts,CO2Curve);

Serial.print("CO2:");

if (percentage == -1){
Serial.print( "<400" );
}
else {
Serial.print(percentage);
}

Serial.print( "ppm\n" );

if (digitalRead(BOOL_PIN) ){
Serial.print( "=====BOOL is HIGH======" );
}
else{
Serial.print( "=====BOOL is LOW======" );
}
Serial.print("\n");

// wifi 센서값 전달
 String cmd = "AT+CIPSTART=\"TCP\",\"";
     cmd += SERVERIP;
     cmd += "\",80";
     Serial.println(cmd);
     mySerial.println(cmd);
     if(mySerial.find("Error"))
    {
      Serial.println( "TCP connect error" );
      return;

}

    String percentage_A(percentage);
     cmd = "GET /CO2_data.php?percentage_R="+percentage_A+"\r\n";
     mySerial.print("AT+CIPSEND=");
     mySerial.println(cmd.length());
     Serial.println(cmd);
     if(mySerial.find(">"))
     {
       Serial.print(">");
       mySerial.print(cmd);
       }
       else
       {
         mySerial.println("AT+CIPCLOSE");
         Serial.println("connect timeout");
         delay(1000);
         return;
       }
       delay(2000);
       Serial.println("====");
       delay(1000);
}

// connectwifi
boolean connectWiFi()
{
   //mySerial.println("AT+CWMODE=1");
String cmd="AT+CWJAP=\"";
cmd+=SSID;
cmd+="\",\"";
cmd+=PASSWORD;
cmd+="\"";
mySerial.println(cmd);
Serial.println(cmd);
delay(3000);
   if(mySerial.find("OK"))
   {
     Serial.println("OK, Connected to WiFi.");
     return true;
   }
   else
   {
     Serial.println("Can not connect to the WiFi.");
     return false;
   }
 }

 // MG811센서의 MGRead(), MGGetPercentage()
 float MGRead(int mg_pin)

{
int i;
float v=0;

for (i=0;i<READ_SAMPLE_TIMES;i++) {
v += analogRead(mg_pin);
delay(READ_SAMPLE_INTERVAL);
}
v = (v/READ_SAMPLE_TIMES) *5/1024 ;
return v;
}

//---------------------------------

int MGGetPercentage(float volts, float *pcurve)
{
if ((volts/DC_GAIN )>=ZERO_POINT_VOLTAGE) {
return -1;
} else {
return pow(10, ((volts/DC_GAIN)-pcurve[1])/pcurve[2]+pcurve[0]);
}
}
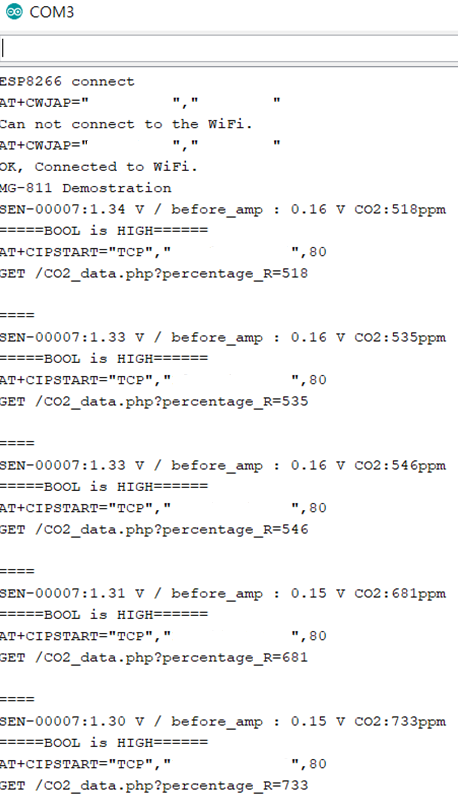
아두이노 Serial 모니터 확인
DB 생성
MySQL에 접속하여 DB 생성 및 사용 권한을 부여한다.

생성한 DB에 접속하여 테이블 생성

PHP 파일 생성
데이터베이스에 센서값 저장


데이터베이스에 센서값 저장 확인 (phpmyadmin)

CO2 값을 웹페이지로 출력하는 php 파일 생성


다른 PHP파일을 호출하여 전체 웹페이지를 보여주는 PHP파일


웹페이지에 데이터 출력 확인

728x90